一. ELK Stack简介 ELK 是 Elasticsearch、Logstrash 和 Kibana 的缩写,它们代表的是一套成熟的日志管理系统,ELK Stack 已经成为目前最流行的集中式日志解决管理方案。
Elasticsearch:分布式搜索和分析引擎,具有高可伸缩、高可靠和易管理等特点。基于 Apache Lucene 构建,能对大容量的数据进行接近实时的存储、搜索和分析操作。通常被用作某些应用的基础搜索引擎,使其具有复杂的搜索功能;
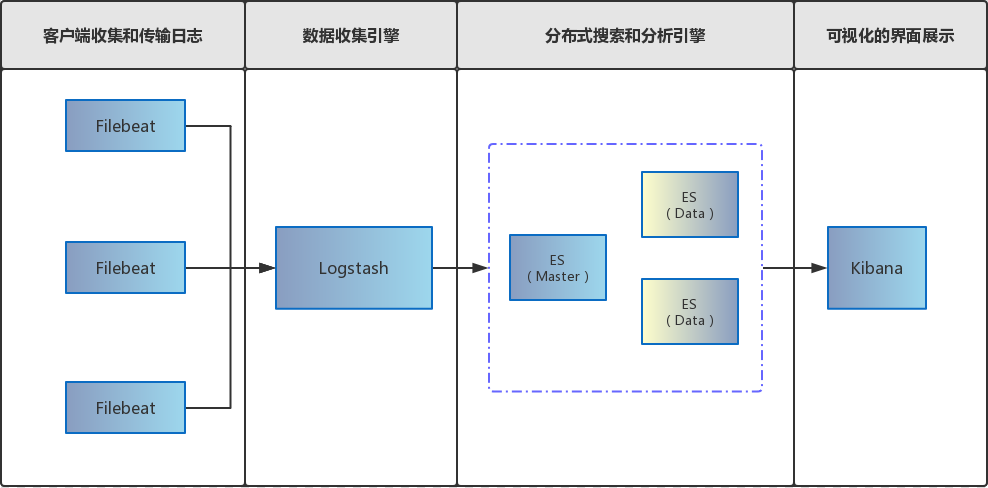
二. 基于Filebeat分布式集群架构部署方案 前面提到 Filebeat已经完全替代了 Logstash-Forwarder成为新一代的日志采集器,同时鉴于它轻量、安全等特点,越来越多人开始使用它。具体基于Filebeat的ELK分布式集中日志解决方案架构如图所示:
三. 软件版本 1 2 3 4 5 Kibana:7.1.1 Filebeat:7.1.1 Logstash:7.1.1 Elasticsearch:7.1.1 Elasticsearch Head:5
四. 环境构建 由于个人不怎么喜欢在windows宿主机上安装各种服务,故在虚拟机里面安装Linux系统进行部署;个人觉得虚拟机安装服务的好处有如下几点:
1. 虚拟机安装Linux 各位自行百度,这里就不教大家如何安装[大家如有需要虚拟机安装Linux系统配置教程可以留言],本文主要目的是Docker Compose部署ELK 7.1.1分布式集群虚拟机 : Oracle VM VirtualBox(相对于VMware轻得多,推荐使用,当然大家可以随意,重点不在虚拟机工具)
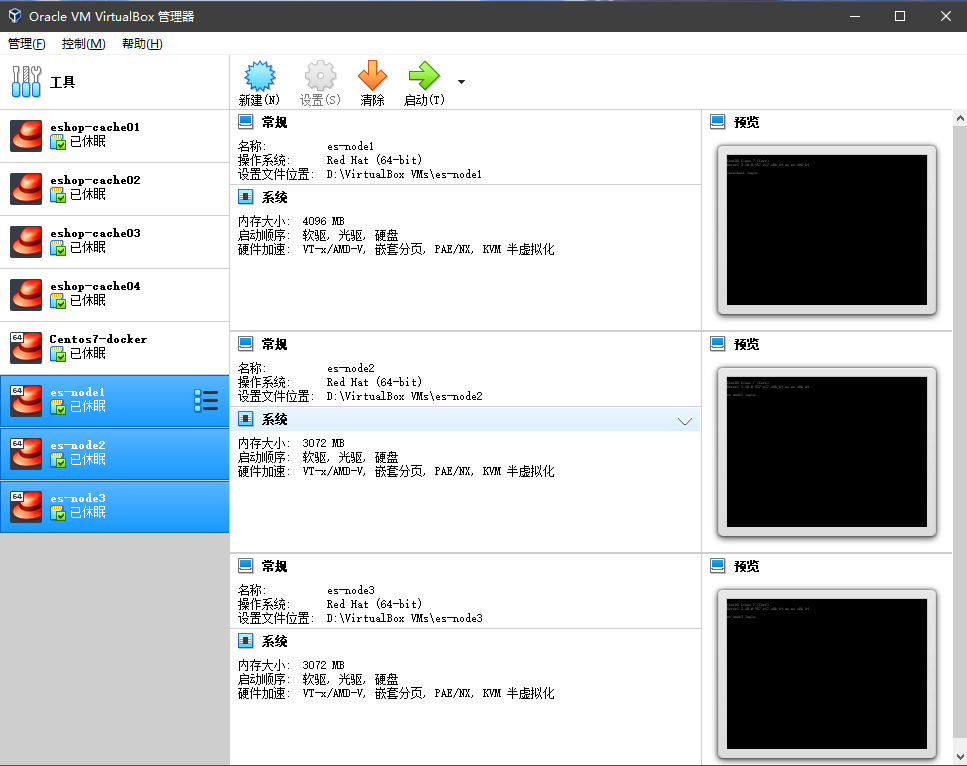
Linux系统分配 :
ES Head效果 :
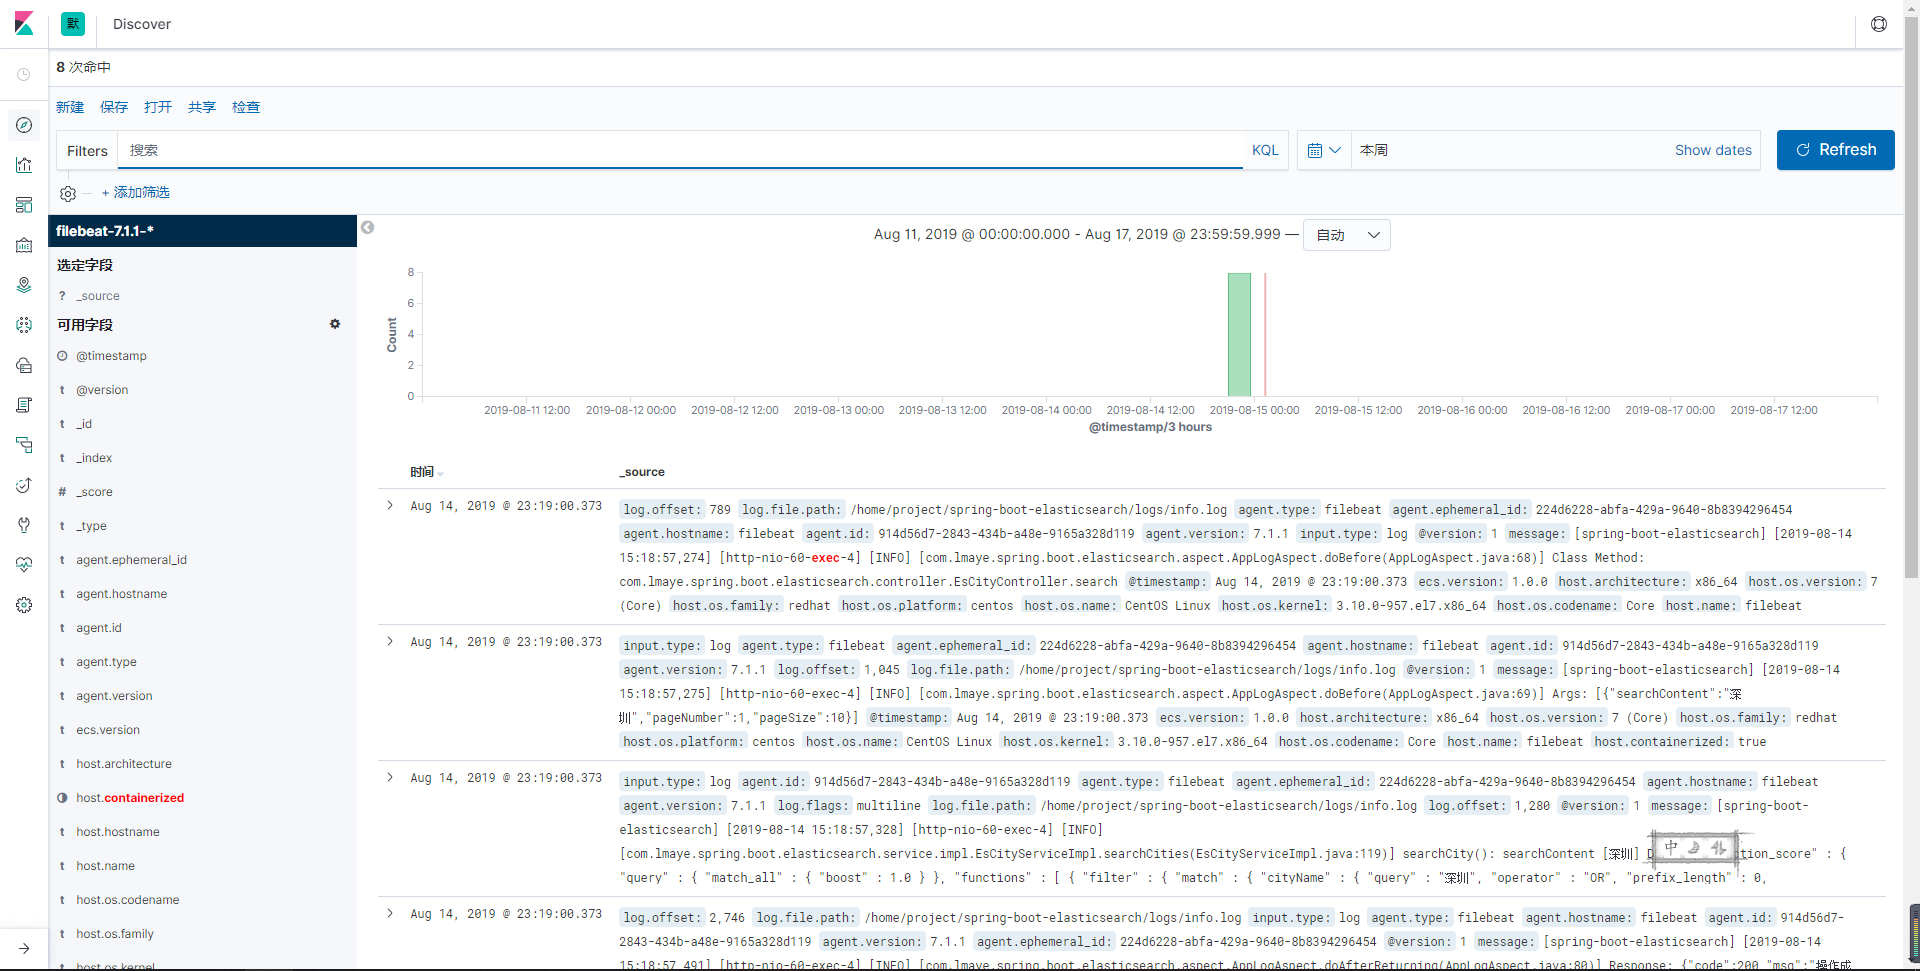
Kibana日志分析效果 :
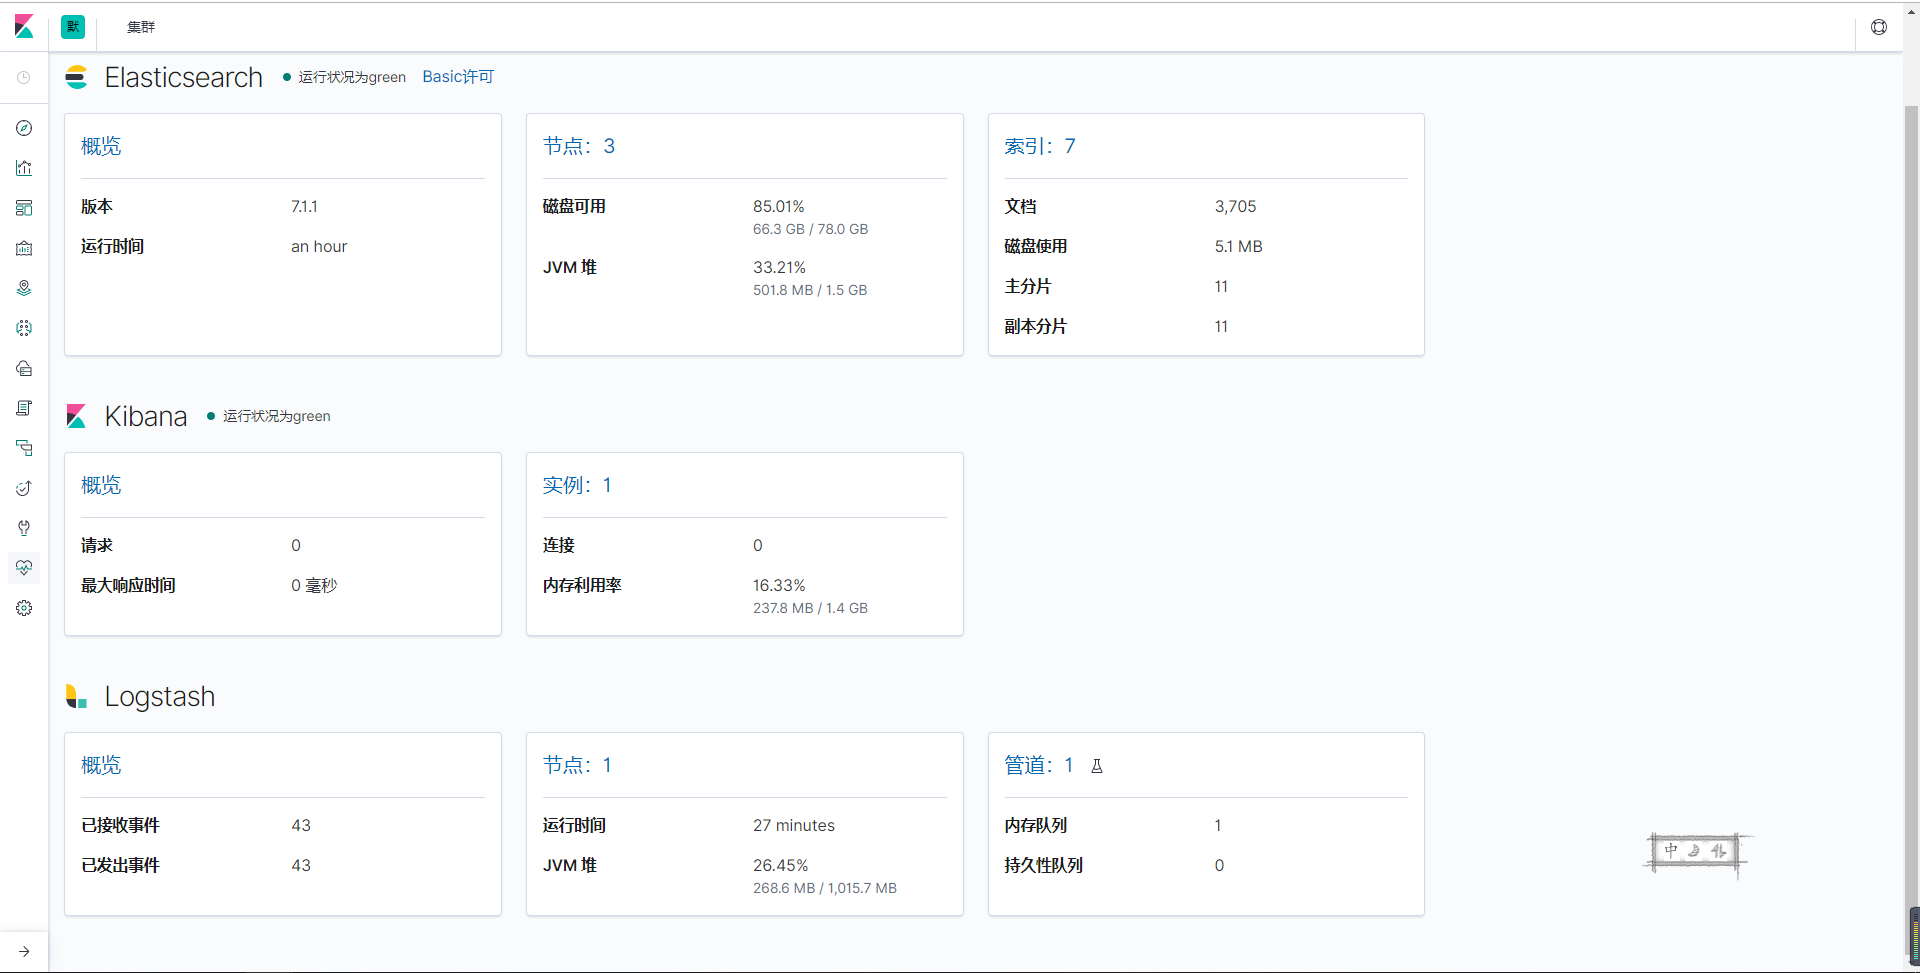
Kibana集群监控效果 :
2. 安装Docker Docker 是一个开源的应用容器引擎,让开发者可以打包他们的应用以及依赖包到一个可移植的镜像中,然后发布到任何流行的 Linux或Windows 机器上,也可以实现虚拟化。容器是完全使用沙箱机制,相互之间不会有任何接口。安装教程 : Centos7 安装 Docker CE
3. 安装Docker Compose 使用 Docker Compose可以轻松、高效的管理容器,它是一个用于定义和运行多容器Docker的应用程序工具。官网安装教程 : 安装 Docker Compose
4. 配置镜像加速器 阿里云地址 : [容器镜像服务](https://cr.console.aliyun.com/?spm=5176.12818093.recent.dcr.568016d0d359YZ **官网安装教程 **: 安装 Docker Compose
1 2 3 4 5 6 7 8 sudo mkdir -p /etc/docker sudo tee /etc/docker/daemon.json <<-'EOF' { "registry-mirrors": ["https://阿里云容器镜像服务获取地址.aliyuncs.com"] } EOF sudo systemctl daemon-reload sudo systemctl restart docker
五. 注意事项 1. 启动报错 [1]: max virtual memory areas vm.max_map_count [65530] is too low, increase to at least [262144](elasticsearch用户拥有的内存权限太小,至少需要262144)1 2 3 4 5 6 7 # 修改配置sysctl.conf [root@localhost ~]# vi /etc/sysctl.conf # 添加下面配置: vm.max_map_count=262144 # 重新加载: [root@localhost ~]# sysctl -p # 最后重新启动elasticsearch,即可启动成功。
2. Docker 命令自动补全 1 2 3 4 # 安装依赖工具bash-complete [root@localhost ~]# yum install -y bash-completion [root@localhost ~]# source /usr/share/bash-completion/completions/docker [root@localhost ~]# source /usr/share/bash-completion/bash_completion
3. 虚拟机磁盘不足 high disk watermark [90%] exceeded on [Hr7ZULQGSGCu9WDsYgLhsA][es-slave1][/usr/share/elasticsearch/data/nodes/0] free: 631.1mb[9.9%], shards will be relocated away from this node※ 虚拟机安装Linux系统时可以避免此问题,磁盘空间设为30G
4. 集群异常 master not discovered yet, this node has not previously joined a bootstrapped (v7+) cluster, and this node must discover master-eligible nodes [es-node1] to bootstrap a cluster: have discovered []; discovery will continue using [192.168.0.110:9300, 192.168.0.111:9300, 192.168.0.112:9300] from hosts providers and [{es-node2}{5XZDDaJCSVify-_Y01NFOw}{XQbK-jmhQ12XIPYh8UnZNA}{172.18.0.2}{172.18.0.2:9300}{ml.machine_memory=1927475200, xpack.installed=true, ml.max_open_jobs=20}] from last-known cluster state; node term 0, last-accepted version 0 in term 0
1 2 3 4 5 6 7 8 9 # 防火墙开启ES TCP端口 [root@es-node1 ~]# firewall-cmd --zone=public --add-port=9200/tcp --permanent [root@es-node1 ~]# firewall-cmd --zone=public --add-port=9300/tcp --permanent # spring boot application [root@es-node1 ~]# firewall-cmd --zone=public --add-port=60/tcp --permanent # logstash [root@es-node1 ~]# firewall-cmd --zone=public --add-port=5044/tcp --permanent # 重新载入 [root@es-node1 ~]# firewall-cmd --reload
2> 发布主机IP, 修改ES配置文件(es-master.yml/es-slave1.yml/es-slave2.yml)并添加如下属性:
1 2 3 4 5 6 7 8 [root@es-node1 ~]# vi ./es-master.yml # 配置发布主机IP network.publish_host: 192.168.0.110 [root@es-node1 ~]# ./init.sh [root@es-node1 ~]# docker logs -f es-master ... {"type": "server", "timestamp": "2019-08-12T15:44:06,265+0000", "level": "INFO", "component": "o.e.t.TransportService", "cluster.name": "es-cluster", "node.name": "es-node1", "message": "publish_address {192.168.0.110:9300}, bound_addresses {0.0.0.0:9300}" } ...
六. 核心配置文件 按照上面的步骤来,特别是注意事项的几个点处理好,基本上直接部署服务问题不大(经过多次顽强测试),基本上坑已踩完,相关配置文件也会贴出来,供大家参考。不会Docker基本操作的建议大家去了解了解!!!
1. node1-master 1> docker-compose.yml
1 2 3 4 5 6 7 8 9 10 11 12 13 14 15 16 17 18 19 20 21 22 23 24 25 26 27 28 29 30 31 32 33 34 35 36 37 38 39 40 41 42 43 44 45 46 47 48 49 50 51 52 53 54 55 56 57 58 59 60 61 62 63 64 65 66 67 68 69 70 71 72 73 74 75 76 77 78 79 80 81 82 83 84 85 86 87 88 89 90 91 92 93 94 95 96 97 98 99 100 101 102 103 104 105 106 107 108 109 version: "3" services: nginx: container_name: lmay-nginx image: nginx:1.16 restart: always ports: - 80 :80 - 443 :443 volumes: - ./nginx/www:/usr/share/nginx/html - ./nginx/conf/nginx.conf:/etc/nginx/nginx.conf - ./nginx/logs:/var/log/nginx es-master: container_name: es-master hostname: es-master image: elasticsearch:7.1.1 restart: always ports: - 9200 :9200 - 9300 :9300 volumes: - ./elasticsearch/master/conf/es-master.yml:/usr/share/elasticsearch/config/elasticsearch.yml - ./elasticsearch/master/data:/usr/share/elasticsearch/data - ./elasticsearch/master/logs:/usr/share/elasticsearch/logs environment: - "ES_JAVA_OPTS=-Xms512m -Xmx512m" es-head: container_name: es-head image: mobz/elasticsearch-head:5 restart: always ports: - 9100 :9100 depends_on: - es-master kibana: container_name: kibana hostname: kibana image: kibana:7.1.1 restart: always ports: - 5601 :5601 volumes: - ./kibana/conf/kibana.yml:/usr/share/kibana/config/kibana.yml environment: - elasticsearch.hosts=http://192.168.0.110:9200 depends_on: - es-master filebeat: container_name: filebeat hostname: filebeat image: docker.elastic.co/beats/filebeat:7.1.1 restart: always volumes: - ./filebeat/conf/filebeat.yml:/usr/share/filebeat/filebeat.yml - ./logs:/home/project/spring-boot-elasticsearch/logs - ./filebeat/logs:/usr/share/filebeat/logs - ./filebeat/data:/usr/share/filebeat/data links: - logstash depends_on: - es-master logstash: container_name: logstash hostname: logstash image: logstash:7.1.1 command: logstash -f ./conf/logstash-filebeat.conf restart: always volumes: - ./logstash/conf/logstash-filebeat.conf:/usr/share/logstash/conf/logstash-filebeat.conf - ./logstash/conf/logstash.yml:/usr/share/logstash/config/logstash.yml environment: - elasticsearch.hosts=http://192.168.0.110:9200 ports: - 5044 :5044 depends_on: - es-master spring-boot-elasticsearch: container_name: spring-boot-elasticsearch hostname: spring-boot-elasticsearch image: lmay/spring-boot-elasticsearch:1.0 restart: always working_dir: /home build: . ports: - 60 :60 volumes: - ./logs:/logs depends_on: - es-master command: mvn clean spring-boot:run -Dspring-boot.run.profiles=docker
2> es-master.yml
1 2 3 4 5 6 7 8 9 10 11 12 13 14 15 16 17 18 19 20 21 22 23 24 25 26 27 28 29 cluster.name: es-cluster node.name: es-node1 node.master: true node.data: false network.host: 0.0 .0 .0 network.publish_host: 192.168 .0 .110 http.port: 9200 transport.port: 9300 discovery.seed_hosts: - 192.168 .0 .110 - 192.168 .0 .111 - 192.168 .0 .112 cluster.initial_master_nodes: - es-node1 http.cors.enabled: true http.cors.allow-origin: "*" xpack.security.enabled: false
3> filebeat.yml
1 2 3 4 5 6 7 8 9 10 11 12 13 14 15 16 17 18 19 20 21 22 23 24 25 26 27 28 29 30 31 32 33 filebeat.inputs: - type: log enabled: true paths: - /home/project/spring-boot-elasticsearch/logs/*.log multiline.pattern: ^\[ multiline.negate: true multiline.match: after filebeat.config.modules: path: ${path.config}/modules.d/*.yml reload.enabled: false setup.template.settings: index.number_of_shards: 1 setup.dashboards.enabled: false setup.kibana: host: "http://192.168.0.110:5601" output.logstash: hosts: ["192.168.0.110:5044" ] processors: - add_host_metadata: ~ - add_cloud_metadata: ~
4> kibana.yml
1 2 3 4 5 6 7 8 server.port: 5601 server.host: "0.0.0.0" elasticsearch.hosts: ["http://192.168.0.110:9200" , "http://192.168.0.111:9200" , "http://192.168.0.112:9200" ]i18n.locale: "zh-CN"
5> logstash.yml
1 2 3 4 5 6 xpack.monitoring.enabled: true xpack.monitoring.elasticsearch.hosts: ["http://192.168.0.110:9200" , "http://192.168.0.111:9200" , "http://192.168.0.112:9200" ]xpack.management.enabled: false
6> logstash-filebeat.conf
1 2 3 4 5 6 7 8 9 10 11 12 13 14 15 16 17 18 19 20 21 22 23 input { beats { port => "5044" } } filter { grok { match => { "message" => "%{COMBINEDAPACHELOG} " } } geoip { source => "clientip" } } output { elasticsearch { hosts => ["http://192.168.0.110:9200" , "http://192.168.0.111:9200" , "http://192.168.0.112:9200" ] index => "%{[@metadata][beat]} -%{[@metadata][version]} -%{+YYYY.MM.dd} " } }
7> Dockerfile
1 2 3 4 5 6 7 FROM java:8 MAINTAINER lmay Zhou <lmay@lmaye.com> VOLUME /tmp ADD ./spring-boot-elasticsearch-1.0.1-SNAPSHOT.jar /app/ ENTRYPOINT ["java" , "-Xmx200m" , "-jar" , "/app/spring-boot-elasticsearch-1.0.1-SNAPSHOT.jar" ]EXPOSE 60
8> nginx.conf
1 2 3 4 5 6 7 8 9 10 11 12 13 14 15 16 17 18 19 20 21 22 23 24 25 26 27 28 29 30 31 32 33 34 35 36 37 worker_processes 1 ; events { worker_connections 1024 ; } http { include mime.types; default_type application/octet-stream; sendfile on; keepalive_timeout 65 ; upstream spring-boot-es { server 192.168 .0 .111 :60 weight=5; server 192.168 .0 .112 :60 weight=5; server 192.168 .0 .110 :60 backup; } server { listen 80 ; server_name localhost; location / { proxy_pass http://spring-boot-es; proxy_set_header Host $host; proxy_set_header X-Real-IP $remote_addr; proxy_set_header X-Forwarded-For $proxy_add_x_forwarded_for; } error_page 500 502 503 504 /50x.html; location = /50x.html { root html; } } }
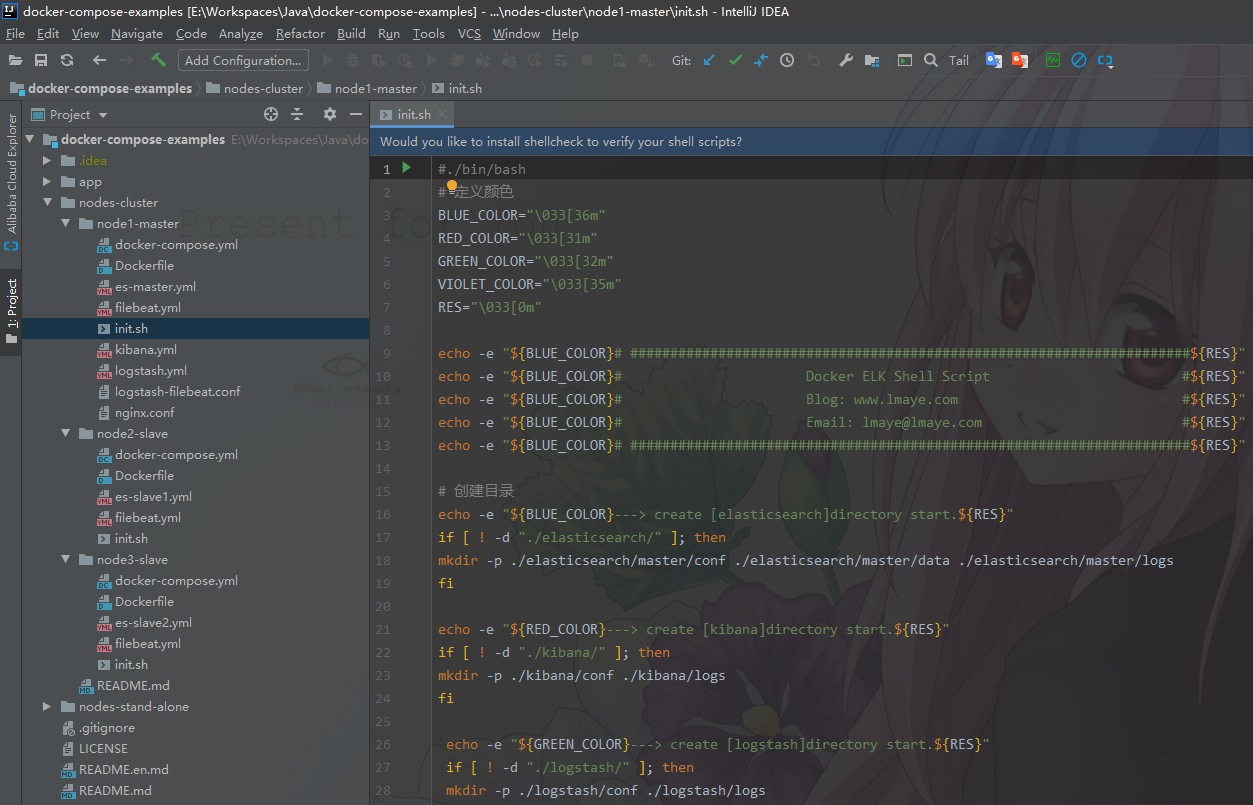
9> init.sh(部署Shell脚本)
2. node2-slave/node3-slave 1> docker-compose.yml
1 2 3 4 5 6 7 8 9 10 11 12 13 14 15 16 17 18 19 20 21 22 23 24 25 26 27 28 29 30 31 32 33 34 35 36 37 38 39 40 41 42 43 44 45 46 47 48 49 50 version: "3" services: es-slave1: container_name: es-slave1 image: elasticsearch:7.1.1 restart: always ports: - 9200 :9200 - 9300 :9300 volumes: - ./elasticsearch/slave1/conf/es-slave1.yml:/usr/share/elasticsearch/config/elasticsearch.yml - ./elasticsearch/slave1/data:/usr/share/elasticsearch/data - ./elasticsearch/slave1/logs:/usr/share/elasticsearch/logs environment: - "ES_JAVA_OPTS=-Xms512m -Xmx512m" filebeat: container_name: filebeat hostname: filebeat image: docker.elastic.co/beats/filebeat:7.1.1 restart: always volumes: - ./filebeat/conf/filebeat.yml:/usr/share/filebeat/filebeat.yml - ./logs:/home/project/spring-boot-elasticsearch/logs - ./filebeat/logs:/usr/share/filebeat/logs - ./filebeat/data:/usr/share/filebeat/data spring-boot-elasticsearch: container_name: spring-boot-elasticsearch hostname: spring-boot-elasticsearch image: lmay/spring-boot-elasticsearch:1.0 restart: always working_dir: /home build: . ports: - 60 :60 volumes: - ./logs:/logs depends_on: - es-slave1 command: mvn clean spring-boot:run -Dspring-boot.run.profiles=docker
2> es-slave1.yml/es-slave2.yml
1 2 3 4 5 6 7 8 9 10 11 12 13 14 15 16 17 18 19 20 21 22 23 24 25 26 27 28 29 cluster.name: es-cluster node.name: es-node2/es-node3(改动地方) node.master: true node.data: false network.host: 0.0 .0 .0 network.publish_host: 192.168 .0 .111 /192.168.0.112(改动地方) http.port: 9200 transport.port: 9300 discovery.seed_hosts: - 192.168 .0 .110 - 192.168 .0 .111 - 192.168 .0 .112 cluster.initial_master_nodes: - es-node1 http.cors.enabled: true http.cors.allow-origin: "*" xpack.security.enabled: false
3> filebeat.yml
1 2 3 4 5 6 7 8 9 10 11 12 13 14 15 16 17 18 19 20 21 22 23 24 25 26 27 28 29 30 31 32 33 filebeat.inputs: - type: log enabled: true paths: - /home/project/spring-boot-elasticsearch/logs/*.log multiline.pattern: ^\[ multiline.negate: true multiline.match: after filebeat.config.modules: path: ${path.config}/modules.d/*.yml reload.enabled: false setup.template.settings: index.number_of_shards: 1 setup.dashboards.enabled: false setup.kibana: host: "http://192.168.0.110:5601" output.logstash: hosts: ["192.168.0.110:5044" ] processors: - add_host_metadata: ~ - add_cloud_metadata: ~
4> Dockerfile
1
2
3
4
5
6
7
FROM java:8 MAINTAINER lmay Zhou <lmay@lmaye.com> VOLUME /tmp ADD ./spring-boot-elasticsearch-1.0.1-SNAPSHOT.jar /app/ ENTRYPOINT ["java" , "-Xmx200m" , "-jar" , "/app/spring-boot-elasticsearch-1.0.1-SNAPSHOT.jar" ]EXPOSE 60
5> init.sh(部署Shell脚本)
七. 目录结构 具体过程就不再次叙述了,详情请见(单机版)
1. 配置结构
2. 部署结构
八. 源码地址 如果有更好的idea也欢迎互相交流,联系方式博客菜单about ~ ~码云源码
