一. 介绍 Redis集群搭建的方式有多种,例如使用zookeeper等,但从redis 3.0之后版本支持redis-cluster集群,Redis-Cluster采用无中心结构,每个节点保存数据和整个集群状态,每个节点都和其他所有 节点连接。redis cluster自动master + slave复制和读写分离,master+slave高可用和主备切换,支持多个master的hash slot支持数据分布式存储。
二. Redis Cluster配置属性 1 2 3 4 5 cluster-enabled <yes/no> cluster-config-file <filename>:这是指定一个文件,供cluster模式下的redis实例将集群状态保存在那里,包括集群中其他机器的信息,比如节点的上线和下限,故障转移,不是我们去维护的,给它指定一个文件,让redis自己去维护的 cluster-node-timeout <milliseconds>:节点存活超时时长,超过一定时长,认为节点宕机,master宕机的话就会触发主备切换,slave宕机就不会提供服务
三. 创建和配置 3.1 创建目录 /etc/redis(存放redis的配置文件)
1 2 3 mkdir -p /etc/redis-cluster mkdir -p /var/log/redis mkdir -p /var/redis/7001
3.2 修改配置文件(redis.conf 重命名 7001.conf) 1 2 3 4 5 6 7 8 9 10 port 7001 cluster-enabled yes cluster-config-file /etc/redis-cluster/node-7001.conf cluster-node-timeout 15000 daemonize yes pidfile /var/run/redis_7001.pid dir /var/redis/7001 logfile /var/log/redis/7001.log bind 192.168.0.5 appendonly yes
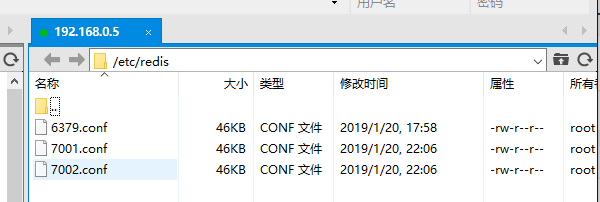
存放路径如图所示:
3.2 启动脚本配置 1 2 3 4 5 6 7 8 9 10 11 12 13 14 15 16 17 18 19 20 21 22 23 24 25 26 27 28 29 30 31 32 33 34 35 36 37 38 39 40 41 42 43 44 45 46 47 48 49 cp /usr/local/redis-3.2.8/utils/redis_init_script /etc/init.d/redis_7001 vi /etc/init.d/redis_7001 # !/bin/sh # # as it does use of the /proc filesystem. # chkconfig: 2345 90 10 # description: Redis is a persistent key-value database # 每个启动脚本内,都修改对应的端口号 REDISPORT=7001 EXEC=/usr/local/bin/redis-server CLIEXEC=/usr/local/bin/redis-cli PIDFILE=/var/run/redis_${REDISPORT}.pid CONF="/etc/redis/${REDISPORT}.conf" case "$1" in start) if [ -f $PIDFILE ] then echo "$PIDFILE exists, process is already running or crashed" else echo "Starting Redis server..." $EXEC $CONF fi ;; stop) if [ ! -f $PIDFILE ] then echo "$PIDFILE does not exist, process is not running" else PID=$(cat $PIDFILE) echo "Stopping ..." $CLIEXEC -p $REDISPORT shutdown while [ -x /proc/${PID} ] do echo "Waiting for Redis to shutdown ..." sleep 1 done echo "Redis stopped" fi ;; *) echo "Please use start or stop as first argument" ;; esac
分别在每个虚拟机/etc/init.d下,放6个启动脚本,分别为:
1 2 3 4 5 6 [root@sw01 utils]# cd /etc/init.d/ [root@sw01 utils]# ./redis_7001 start [root@sw01 utils]# ps -ef | grep redis root 26227 1 0 Jan21 ? 00:03:23 /usr/local/bin/redis-server 192.168.0.5:7002 [cluster] root 26355 1 0 Jan21 ? 00:03:08 /usr/local/bin/redis-server 192.168.0.5:7001 [cluster] root 26659 26254 0 04:44 pts/0 00:00:00 grep redis
四. 安装ruby创建集群 只需要在一台服务器安装即可
3.1 下载安装 1 2 3 4 5 6 7 [root@sw01 utils]# wget https://cache.ruby-lang.org/pub/ruby/2.3/ruby-2.3.1.tar.gz [root@sw01 utils]# tar -zxvf ruby-2.3.1.tar.gz [root@sw01 utils]# ./configure -prefix=/usr/local/ruby [root@sw01 utils]# make && make install [root@sw01 utils]# cd /usr/local/ruby [root@sw01 utils]# cp bin/ruby /usr/local/bin [root@sw01 utils]# cp bin/gem /usr/local/bin
3.2 centos安装较高版本ruby2.2+(RVM 安装) centos安装较高版本ruby2.2+(RVM 安装)
3.3 Redis配置集群遇到问题及解决方法 Redis配置集群遇到问题及解决方法
3.4 创建集群 1 2 3 4 5 6 7 8 9 10 11 12 13 14 15 16 17 18 19 20 21 22 23 24 25 26 27 [root@sw01 utils]# cp /usr/local/redis-3.2.8/src/redis-trib.rb /usr/local/bin [root@sw01 utils]# redis-trib.rb create --replicas 1 192.168.0.5:7001 192.168.0.5:7002 192.168.0.6:7003 192.168.0.6:7004 192.168.0.7:7005 192.168.0.7:7006 输入:yes [root@sw01 utils]# redis-trib.rb check 192.168.0.5:7001 > >> Performing Cluster Check (using node 192.168.0.5:7001) S: bcb8d971ed0875c173f50af950f6b7590b79510d 192.168.0.5:7001 slots: (0 slots) slave replicates dedb9de54b51aa09106c772d743456b31e5d884f M: 9617ff44c32b9afe9414724057cfdbeb65b492ab 192.168.0.7:7006 slots:10923-16383 (5461 slots) master 1 additional replica(s) M: bb4313206fbacf94992f3b1de33e82373f9eb769 192.168.0.6:7003 slots:5461-10922 (5462 slots) master 1 additional replica(s) S: 1aa3316590a71b6f788a31cebc109a76b654c5fb 192.168.0.7:7005 slots: (0 slots) slave replicates 9617ff44c32b9afe9414724057cfdbeb65b492ab S: f5648903d98526ee798b7aa7dfcc3f747652a229 192.168.0.5:7002 slots: (0 slots) slave replicates bb4313206fbacf94992f3b1de33e82373f9eb769 M: dedb9de54b51aa09106c772d743456b31e5d884f 192.168.0.6:7004 slots:0-5460 (5461 slots) master 1 additional replica(s) [OK] All nodes agree about slots configuration. > >> Check for open slots... > >> Check slots coverage... [OK] All 16384 slots covered.
配置完成


